

Free Pattern
Easy Crochet Kindle Sleeve
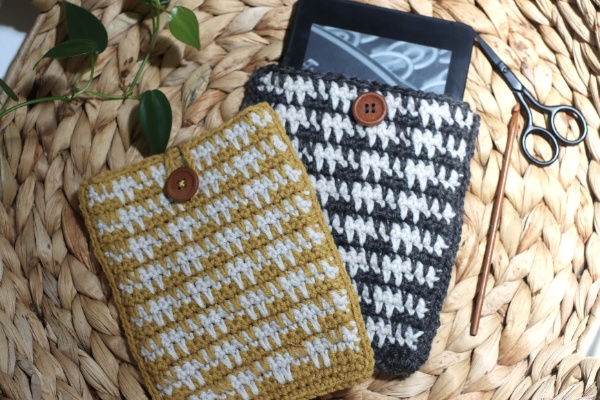
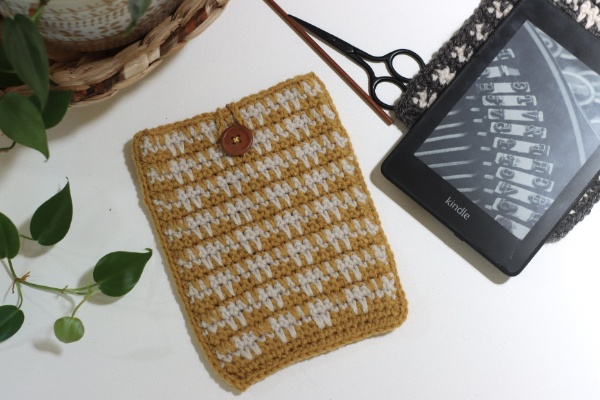
This free crochet Kindle sleeve pattern uses a simple stitch repeat and easy colour changes.
I wanted to create a pattern that looks like a traditional houndstooth print. However, the usual crochet houndstooth stitch that alternates single crochet stitches with double crochet stitches didn’t give me the look I was going for.
After some experimentation I came up with this design using spike stitches.
Materials
Yarn:
#4 medium/worsted weight yarn, e.g., Colour Theory from Lion Brand Yarn.
You will need yarn in two contrasting colours – Colour A and Colour B in the pattern. I used the Bee Pollen colourway for Colour A and Moonbeam for Colour B.
Crochet Hook:
4 mm (G-6) crochet hook., or hook needed to obtain gauge.
Notions:
- one button
- scissors
- yarn needle
- measuring tape or gauge ruler
- sewing needle
- sewing thread
Pattern Notes
Skill Level
This is an easy-level pattern. You’ll need to be familiar with simple colour changes, single crochet stitch, and spike stitch.
How to Change Colours
Begin the final stitch of the row as usual, but before the final yarn over, drop the working yarn, pick up the new colour, yarn over, and pull through the last two loops of the stitch.
When changing colours, carry the old colour up the side of your work to minimize the number of ends to weave in – yay for fewer ends!
Special Stitches/Techniques Used
Single Crochet Spike Stitch – Worked as for standard Single Crochet, except that instead of working into the tops of your stitches, you drop down and work them into the single crochet stitch in the row below.
If you’re unsure, this spike stitch tutorial will teach you all you need to know.
Stitch Abbreviations
ch – chain
st/sts – stitch/stitches
sc – single crochet
Gauge
4″ = 19 rows x 16 sts in single crochet with a 4 mm hook.
How to Read the Pattern
- The number in brackets at the end of the row refers to the stitch count, e.g., (20 sc).
- The ch1 is a turning chain only, it does not count as a stitch.
- Numbers after letters, e.g., sc3, means work a single crochet in each of the next 3 stitches.

Crochet Kindle Sleeve Pattern instructions
FRONT
Working with Colour A, chain 21.
Row 1: Sc in 2nd chain from hook and each chain across. (20 sc).
Row 2: Ch1, turn, sc in each stitch across. Change to Colour B in the last stitch.
Row 3: Ch1, turn, sc3, *spike st 2, sc2, repeat from * till three stitches remain, sc3.
Row 4: Ch1, turn, sc in each stitch across. Change to Colour A in the last stitch.
Row 5: Ch1, turn, sc1, *spike st 2, sc2, repeat from * till three stitches remain, spike st 2, then sc in last stitch.
Row 6: Ch1, turn, sc in each stitch across. Change to Colour B in the last stitch.
Rows 7-30: Repeat rows 3-6.
Row 31: Ch1, turn, sc3, *spike st 2, sc2, repeat from * till three stitches remain, sc3.
Row 32: Ch1, turn, sc in each stitch across. Change to Colour A in the last stitch.
Row 33: Ch1, turn, sc1, *spike st 2, sc2, repeat from * till three stitches remain,spike st 2, then sc in last stitch.
Cut yarn and weave in ends.
BACK
Working with Colour A, chain 21.
Row 1: Sc in 2nd chain from hook and each chain across. (20 sc).
Row 2: Ch1, turn, sc in each stitch across.
Row 3-32: Repeat row 2.
In the next row, you will crochet a series of chain stitches to create a button loop.
Row 33: Ch1, turn, sc10, ch 12, sc10.
Cut yarn and weave in ends.
TO FINISH
Determine the right sides of your work; the odd rows are worked on the right sides.
Working with Colour A and right sides facing out, single crochet evenly around three sides to join, working two single crochet stitches in the corners.
To work out where to sew your button, pull down gently on the button loop and mark the point it reaches on the front of your Kindle cover; this is where the centre of your button should be.
Weave in your ends, attach your button, and you are done!


Leave a Reply